Moving your website to a new domain can be a daunting but necessary process. Whether you’re moving your site for a rebrand, consolidation or you’ve simply got your hands on a better domain, you should be thinking about your SEO.
I’ve moved websites to new domains countless times and the great news is that if done correctly, you can easily preserve your rankings and domain authority by correctly using 301 redirects and Google Webmaster Tools. In this tutorial, I’m going to walk you through the exact process that I use to change domains whilst having no negative impact on SEO.
A few things first.
My colleague Nick and I are currently working on a video blog that walks through the different circumstances as to why you might be changing domains. I’ll link that up once it’s live, but in the meantime I’m going to assume that you’re simply changing domains, and your website architecture (sitemap, URLs etc) are not going to change.

As Google themselves recommend, if you’re changing domains AND launching a new website, you should do it in two separate phases. Change the domain first, then update the website once the domain change has settled.
Step 1 – Preparation
In all, the process of changing domain names can take less than an hour if you’re prepared. Before you begin, you should have the following things ready and in place:
- Either a full working version of the same website, located on the NEW domain name, on it’s own hosting environment (with either robots.txt and/or Meta Tags temporarily in place to block search engines until you’ve 301’d).
- Or, the ability to quickly change your hosted site’s domain via your hosting panel and (if necessary) Database references to the domain.
Either of the above options are fine, but you need to make sure that you can still host both domains after you launch the site on the new domain. Your old domain will need to host a small ‘.htaccess file’ in order to ensure redirects are passed onto the new domain.
- Both domains should be verified and accessible in your Google Webmaster Tools account.
- If you use Google Analytics, ensure you have sufficient permissions to change the domain settings for your site’s profile.
- Back-up your website and database(s).
Step 2 – 301 redirect(s)
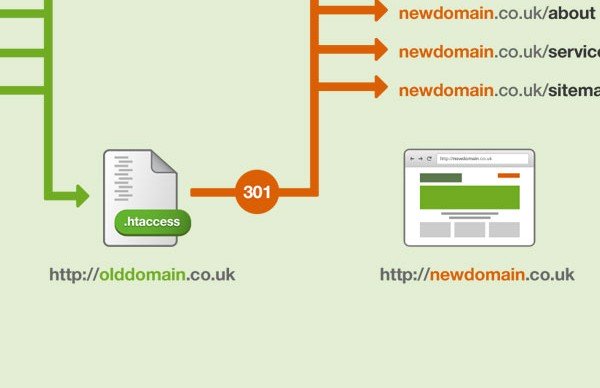
In order to preserve both your traffic and back-link equity from the old domain, it’s important to 301 redirect all of your individual URLs to the new domain. The simplest and most efficient way to do this, is via your site’s .htaccess file. If you look at the diagram below, this illustrates how you can host a lone .htaccess file on your old domain that redirects all requests onto their counterpart at the new domain:
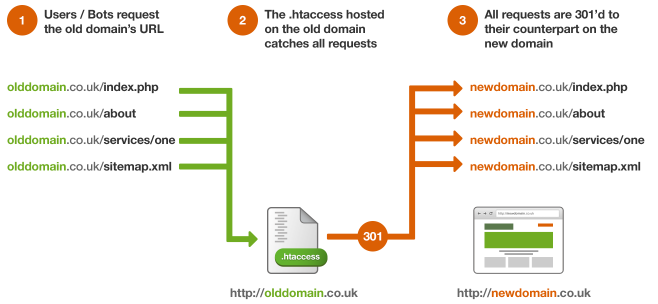
I should again stress that I’m assuming that your only changing domain and therefore your sitemap and individual URLs are not going to change. In my diagram above, you can see how individual spec-specific requests can be directly matched and redirected onto the same page at the new domain. Using the .htaccess template below, you can do this dynamically without having to write a 301 redirect line of code for each individual page:
By adding this code to your old domain’s hosted .htaccess file, you’re essentially saying if someone accesses any URL that isn’t the using the new URL (newdomain.co.uk), then redirect to the same URL but under the new domain. Therefore no matter how many pages your site has, the above 2 lines of .htaccess will work for all of your pages. If however your URLs have changed too, you’ll need to individually redirect each page on the .htaccess file like this:
redirect 301 /old-contact-url.html http://www.newdomain.co.uk/new-contact-url
redirect 301 /old-about-url.html http://www.newdomain.co.uk/old-about-url
It’s important to have your .htaccess file and/or 301 commands ready before you switch the domain over. Once you’ve successfully migrated your site, this .htaccess file is all you’ll need to host on the old domain in order to successfully redirect.
Step 3 – Change the domain
You should now be in a position to change domains. If you have a separate copy of the same site live on the new domain already, all that remains is to deploy your .htaccess file to the OLD domain hosting. Even if you leave all of your files on the old server as a back-up, the .htaccess file should redirect any and all traffic/requests onto your new domain whether they’re accessing the homepage or an individual landing page. Make sure you remove any robots.txt commands or Meta Tags on the new domain that will prevent it from being crawled and cached.
If, rather than running the two domains alongside each other, you’re changing the one hosted site to the new domain then you’re now ready to do this. Once changed, you now need to set-up hosting for the OLD domain so that you can upload the .htaccess file.
Hopefully step 3 makes sense, if it doesn’t please write a message in the comments below before you proceed.
Step 4 – Tell Google
So by this stage, you should have your website live on the new domain, with any old domain URL requests being 301 redirected to their counterparts on the new domain. Correct implementation of the 301 redirects is good enough alone, but Google offer several features within Webmaster Tools to make sure the process is as smooth as possible.
Webmaster Tools: ‘Change of Address’
Start by performing  a ‘Change of Address‘ within Webmaster Tools for your old domain. Simply navigate to your old domain, and click on the cog in the top right corner:
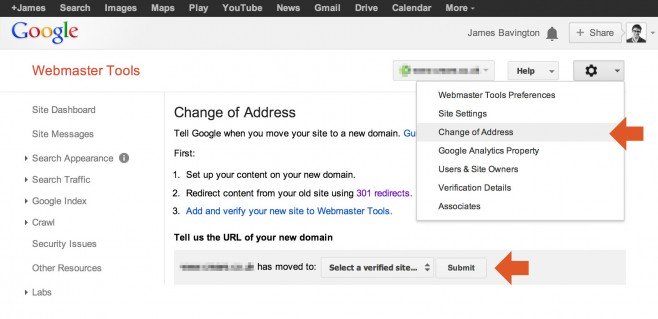
As you should already have your new domain verified too, select this in the drop down below, and press submit. If you’d like to learn more about ‘Change of Address’ and why it’s worth using, Google’s Matt Cutts explains it in a video here.
Webmaster Tools: Submit your new domain’s sitemap(s)
To further assist the process, i’d recommend submitting your new XML sitemaps to Google. Simply navigate to Crawl > Sitemaps:
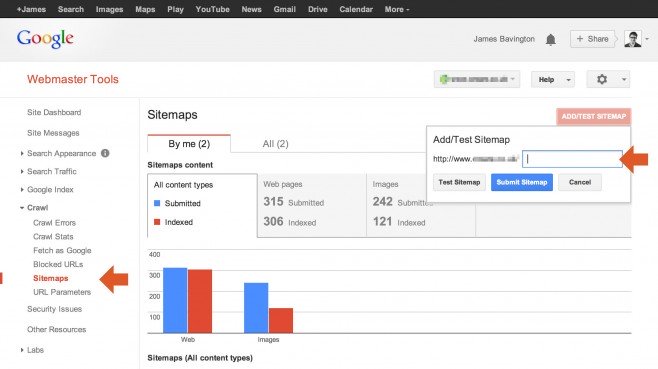
Start by initially testing your XML sitemaps, then once you’re satisfied they’re 100%, Add them onto the profile for crawling.
Webmaster Tools: Fetch as Google
In order to speed up the caching and switch-over of the new domain, i’d also recommend submitting your key page(s) via ‘Fetch as Google’. Navigate to Crawl > Fetch as Google:
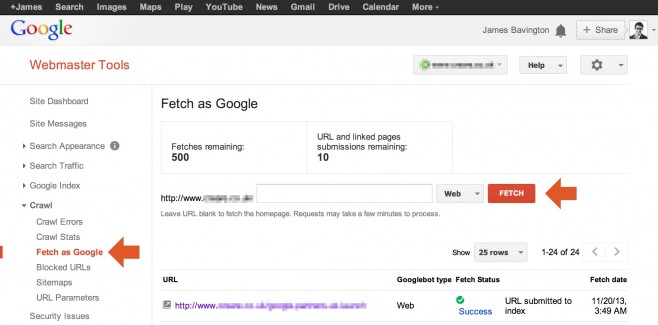
Start by fetching your new domain’s homepage and any other key landing pages that you’d like to be promptly crawled by Google. Worth noting that you don’t need to worry about over-using this feature.
Step 5 – Finishing Up
You should now have a fully working site on the new domain, with the old domain redirecting requests and traffic perfectly. Not only that, but Google is in the process of switching your domain over in its’ cache of your site. I’d recommend spending some time next just testing your 301s, a good way of doing this is to search for your old domain using the search query: site:olddomain.co.uk.
This will bring up all of your old domain’s cached pages within the results. Click away at the various listings to double check they all 301 redirect onto their counterpart on the new domain.
Finally, don’t forget to update your Google Analytics profile. Rather than creating a brand new profile (unless you want to that is) you can simply change the domain URL that you’re asking Google to track.
That’s it! If you have any questions or recommendations to improve this process, I’d love to hear your comments below.