This is a follow-up post to Dan’s excellent Setting Up Gulp with Magento article from a few weeks ago. In this post, I’ll go into more detail about what to include in your gulpfile.js, and I’ll recommend a directory structure that the British Library would be proud of. Well, it works for me anyway…
There’s no point in repeating anything Dan’s already said or there’ll be more steps than to the Burj Khalifa’s fire escape. Therefore I’ll assume you’ve followed Dan’s post to the point where you have Gulp installed for your theme. Now, let’s build on our Gulp installation so that we also run tasks for our JavaScript and images, whilst streamlining our workflow with a few extra plugins.
Creating themes in Magento can be quite cumbersome if done in the wrong way, so I hope this post will help you speed up your frontend development. To get everything ticking like solar-powered Rolex, follow these simple steps:
1) Install Gulp Plugins
The first step is to install all the extra gulp plugins that we want to work with. I have assumed that you have already installed gulp with npm, so I have excluded it from the following command. Within your theme directory, simply run the following command to install these plugins:
npm install gulp-compass gulp-autoprefixer gulp-image-optimization gulp-uglify gulp-concat gulp-rename --save-dev
2) Organise Your Theme Directory
In order to work with the gulpfile.js that I am about to unveil you need to ensure your theme directory is set up correctly to work with it:
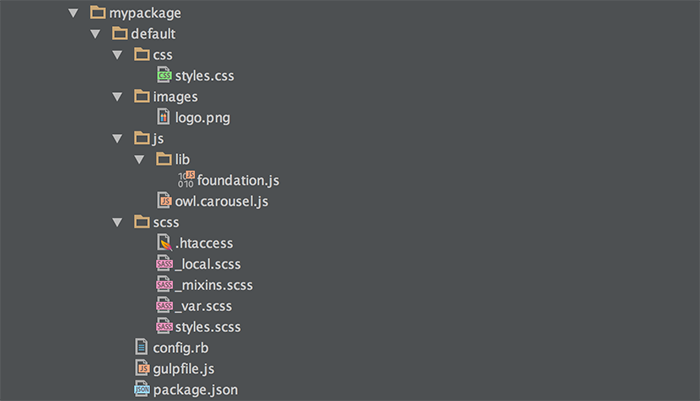
I should mention that I’ve omitted the node_modules directory from the screenshot for simplicity.
3) Setup gulpfile.js
We now have more modules than a Harvard undergraduate, but we’re not actually using them yet. In order to get something working add the following to gulpfile.js so Gulp can start running some new tasks.
In case you’re new to Gulp, here’s an explanation of the tasks included:
Task: compass
This task will compile all .scss files found in the /scss directory of your theme and the fallback themes defined in config.rb, and output them in /css directory. Only styles.css will be created. We have ran the task through a autoprefixer pipe which will prefix the browser-specific CSS accordingly.
Task: js
This task will take any non-minified JavaScript files from the /js directory, compress them and save the output as the same filename but with .min.js as the extension. So owl.carousel.js will be compressed and created as owl.carousel.min.js. You should place files in here that you only want to call onto specific pages – this will stop them being loaded unnecessarily on pages where they are not needed.
Task: libraries
This will take any minified files found in /js/lib and concatenate them all into one file called libraries.min.js, and this will be placed in the /js directory. The idea is that if you need a JavaScript file to be used on every page of the site on the frontend then it should be contained in libraries.js rather than loaded individually.

Task: images
This task simply takes the images found in the /images directory and optimises them for web. Like a fine art collector, some people prefer to keep the originals, in which case you should keep them in an /img directory and output the optimised ones into the /images directory using a dest pipe: .pipe(gulp.dest(‘./images’))
The final task ‘default’ will watch for any changes made to JS/CSS/images and run the appropriate task. There are hundreds of different Gulp plugins and tasks that can be created to achieve even better results, so feel free to give any feedback in the comments section below.