
There are a number of different ways to split-test websites and webpages to see which design or layout converts better. It’s all about CRO – a bit of a trend in web design at the moment (along with UX). CRO stands for conversion rate optimisation – but if you’re reading this post, you probably already know that.
This particular post is a “how-to” for a new (and somewhat experimental) way of split-testing your Magento website using Google Analytics.
There are a lot of tools out there already that allow you to test individual pages – and then track events, ecommerce conversions etc from those pages. This method however is different, it’s more of an old-fashioned method but one which allows you to change your entire theme per visit – not just the styling of a landing page.
If you’re after the individual page kind of testing I’d recommend you take a look at Google Experiments – or alternatively (and a far better tool) Optimizely.
This post is split into the following sections:
Implementation
- The Theory Skip
- Creating your Analytics Accounts Skip
- Installing the 1.7+ Module Skip
- Configuring the 1.7+ Module Skip
The Code
Implementation
The Theory
The theory is simple – you want to make changes to your Magento store – you want to track how those changes affect customer behaviour on your website – however you want to compare these changes against your current theme. The only way to do this effectively is to serve 50% of your customers with the new theme – and keep the other 50% of your site traffic landing on your current theme. This way you don’t have to worry about timeframes being different (for example seasonal / weather-related purchases) – as the split testing all happens at the same time.
So when we are split testing it’s important that the following critical factors are covered:
- Ability to serve exactly 50% of site traffic to the new theme
- Ability to analyse and contrast the new 50% compared to the old 50%
- Keep our normal “master” analytics account untouched (so as not to disrupt our data)
Here is how we are suggesting we split-test Magento using Google Analytics:
- 3x Google Analytics Accounts
- 1x master Google Analytics account to track ALL visitors (this should be your current account)
- 1x “A” Google Analytics account (only shows for the current theme)
- 1x “B” Google Analytics account (only shows for the new theme)
With these accounts set up we should be able to:
- Track all visitors as normal in a MASTER analytics accout
- Track 50% of the overall visitors movements / purchases within our new theme (Account A)
- Track 50% of the overall visitors movements / purchases within our current theme (Account B)
- Easily Draw comparisons between Account A and Account B using all of Google Analytics tools
Here’s a little diagram to make it a little clearer (possibly):
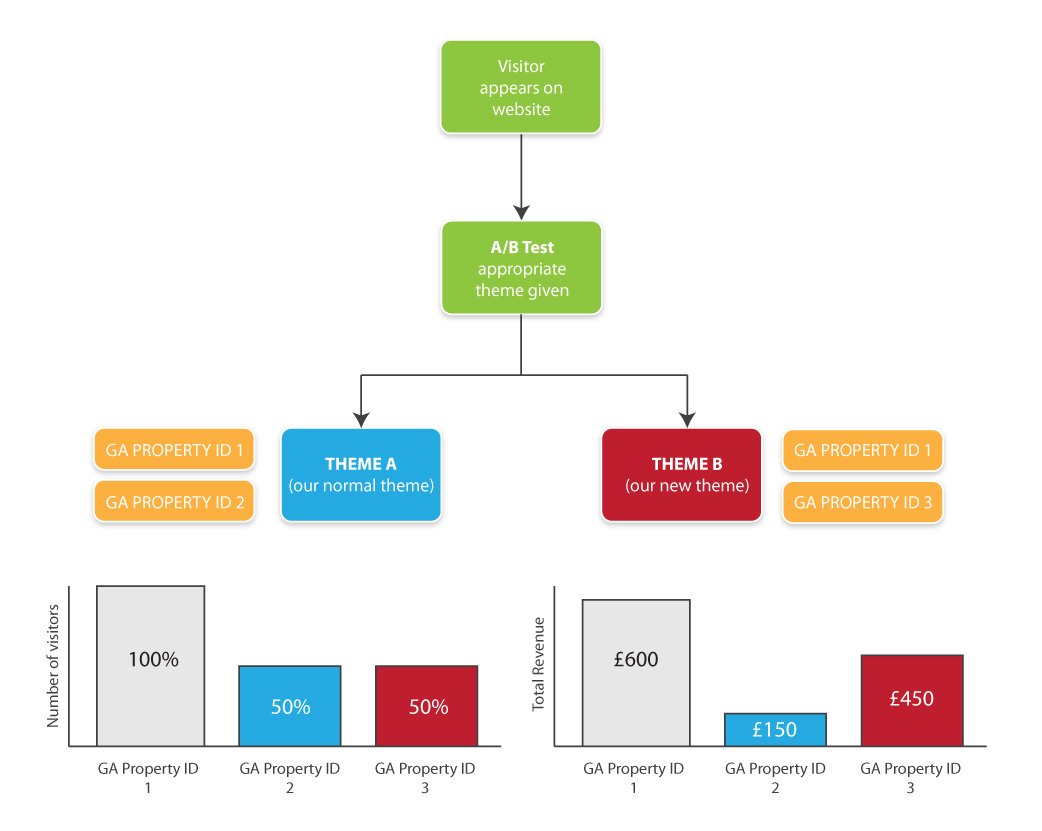
You can then easily measure things like conversion rate %, total revenue etc.
Creating your different Google analytics accounts
So, we now know the theory, how do we put it into practice? The first thing to do is to create your Google Analytics Accounts. I’m assuming that you already have a master google analytics account set up – if not simply create one by going to your account list and clicking Add New Account.
Within this new account area you’ll be asked to complete your new PROPERTY. For the time being please use “Classic Analytics” – I’m not 100% sure that Magento has the ability yet to use the new version dynamically. Proceed to enter all your details then save.
The next thing to do is to create two more identical PROPERTIES within this account. You can navigate back to your account list by clicking on its name in the breadcrumb. Add your properties (name them something like Old Theme, Current Theme) – again making sure that they are using “Classic Analytics” mode.
You should end up with something that looks like this:
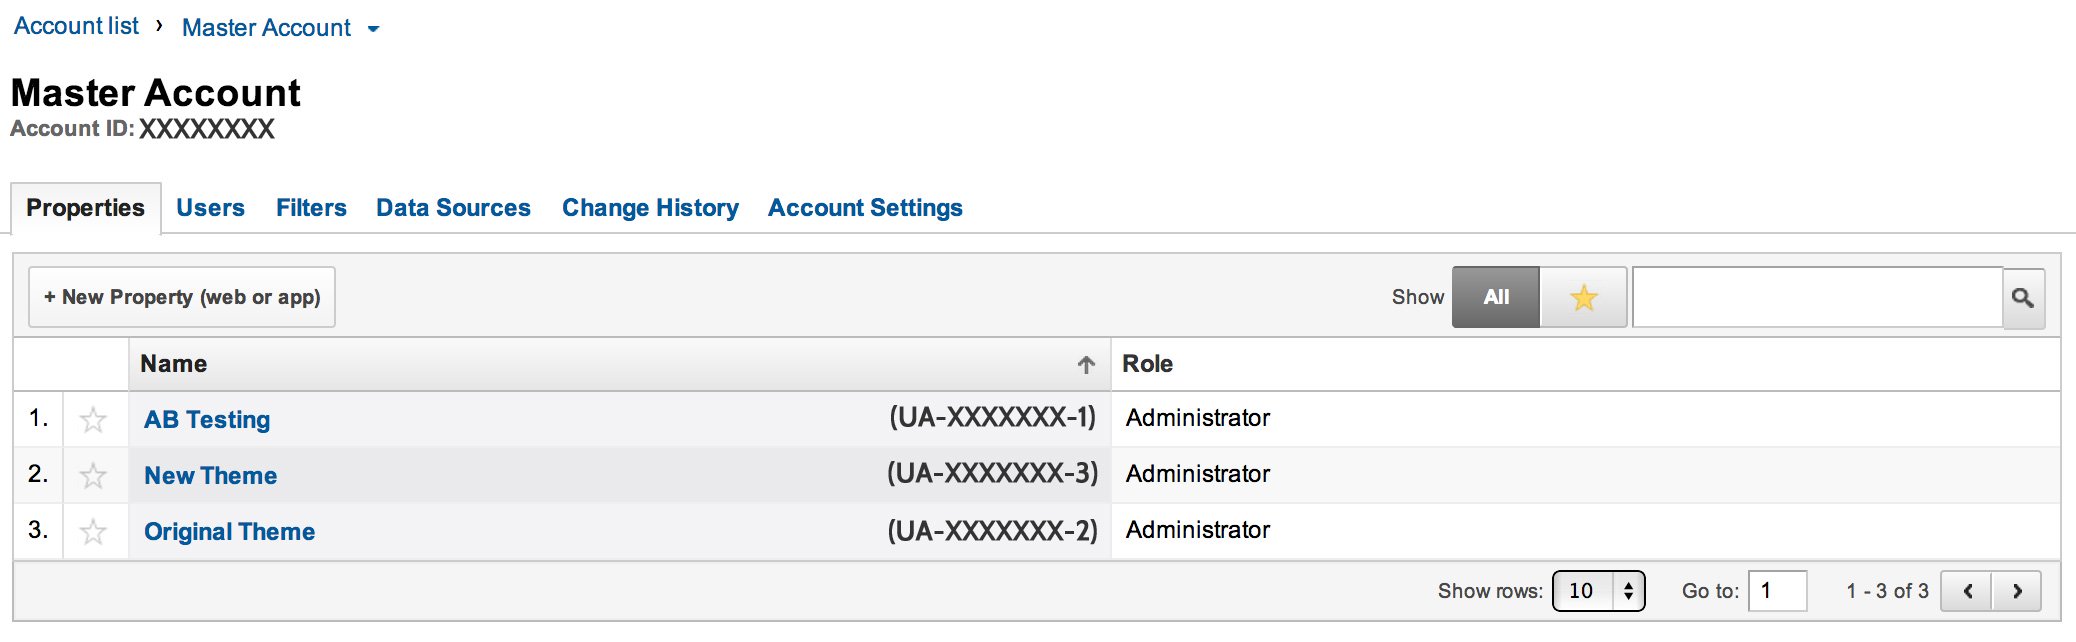
Make note of these property ID’s (tracking codes) as we’ll be using them in our Magento module.
Installing the Magento Module (1.7+)
Unfortunately due to the way Magento displays it’s analytics implementation through 1.4/1.5/1.6 (not really using the ga.phtml) this module is only applicable in Community Edition 1.7+. I’ll demonstrate the actual code itself later in this post for those who want to use this module as a starting point for developing a compatible module for earlier versions of Magento.
You can get the Magento AB Testing module here.
Once installed please make sure that you clear your cache and logout / back in again!
Configuring the module
Now that the module is installed, make sure that your current analytics account settings have been setup correctly.
Navigate to System > Configuration > Google API (on the left) and make sure it’s enabled and your MASTER account GA code is in there.
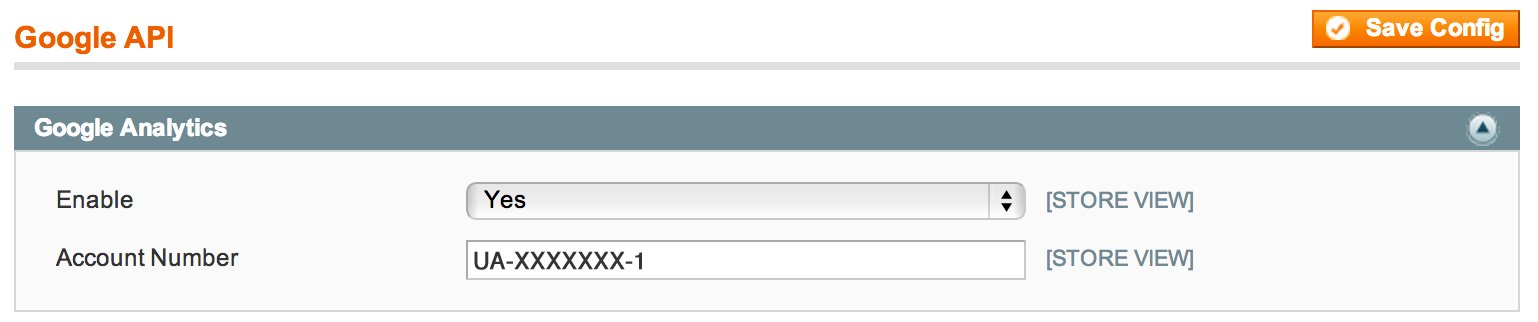
Once that is completed your analytics code should start showing up in your
tag.The last thing to do is to modify your AB testing settings. Navigate to System > Configuration > AB Testing and then use the simple form to select your current theme (in this case default) – paste in your current theme analytics code, then select your new theme and paste in it’s property ID. Set the module as Enabled and you’re good to go.
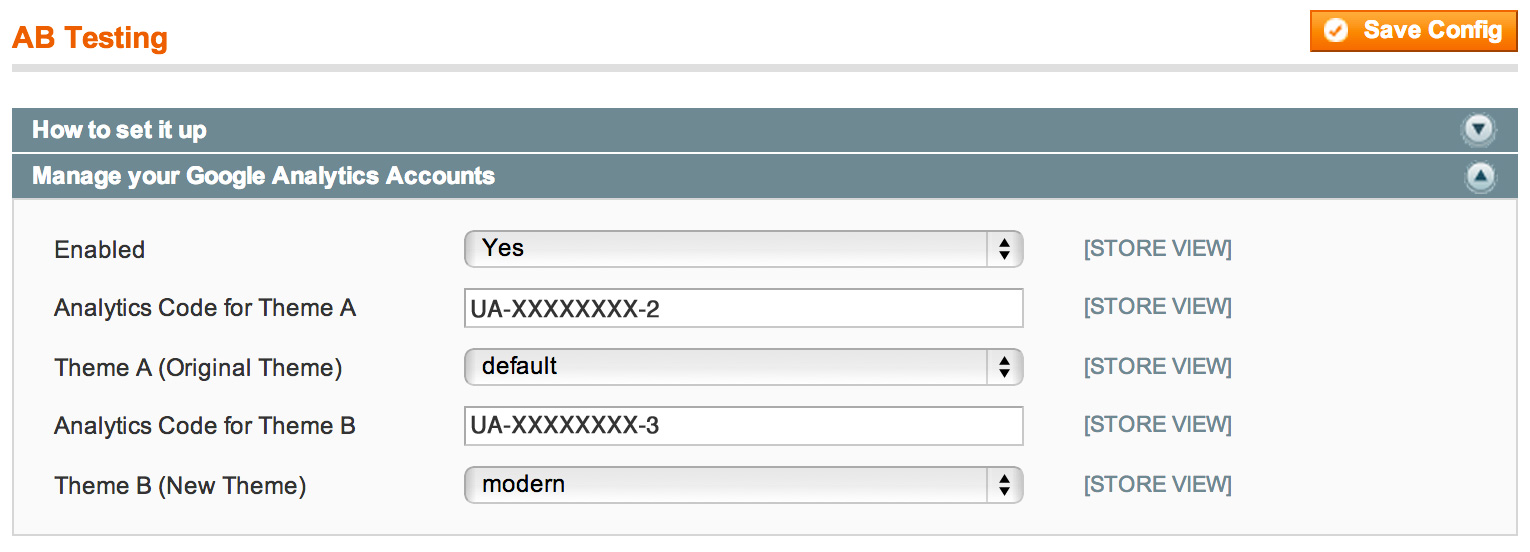
Now that’s done we should give it a test.
Testing the module
Open two browsers – with one visit your website – you should be given the new theme or the old theme, try again in your other browser and you should be given the alternative theme (as long as you’re the next visitor). This alternation will happen every time a visitor visits the website – however, because their choice is saved in a cookie, as they browse the website it will stay using the same theme.
To double-double check, let’s open the source code for each theme – we should see two sets of analytics codes – one for our MASTER account and one for our THEME X account.
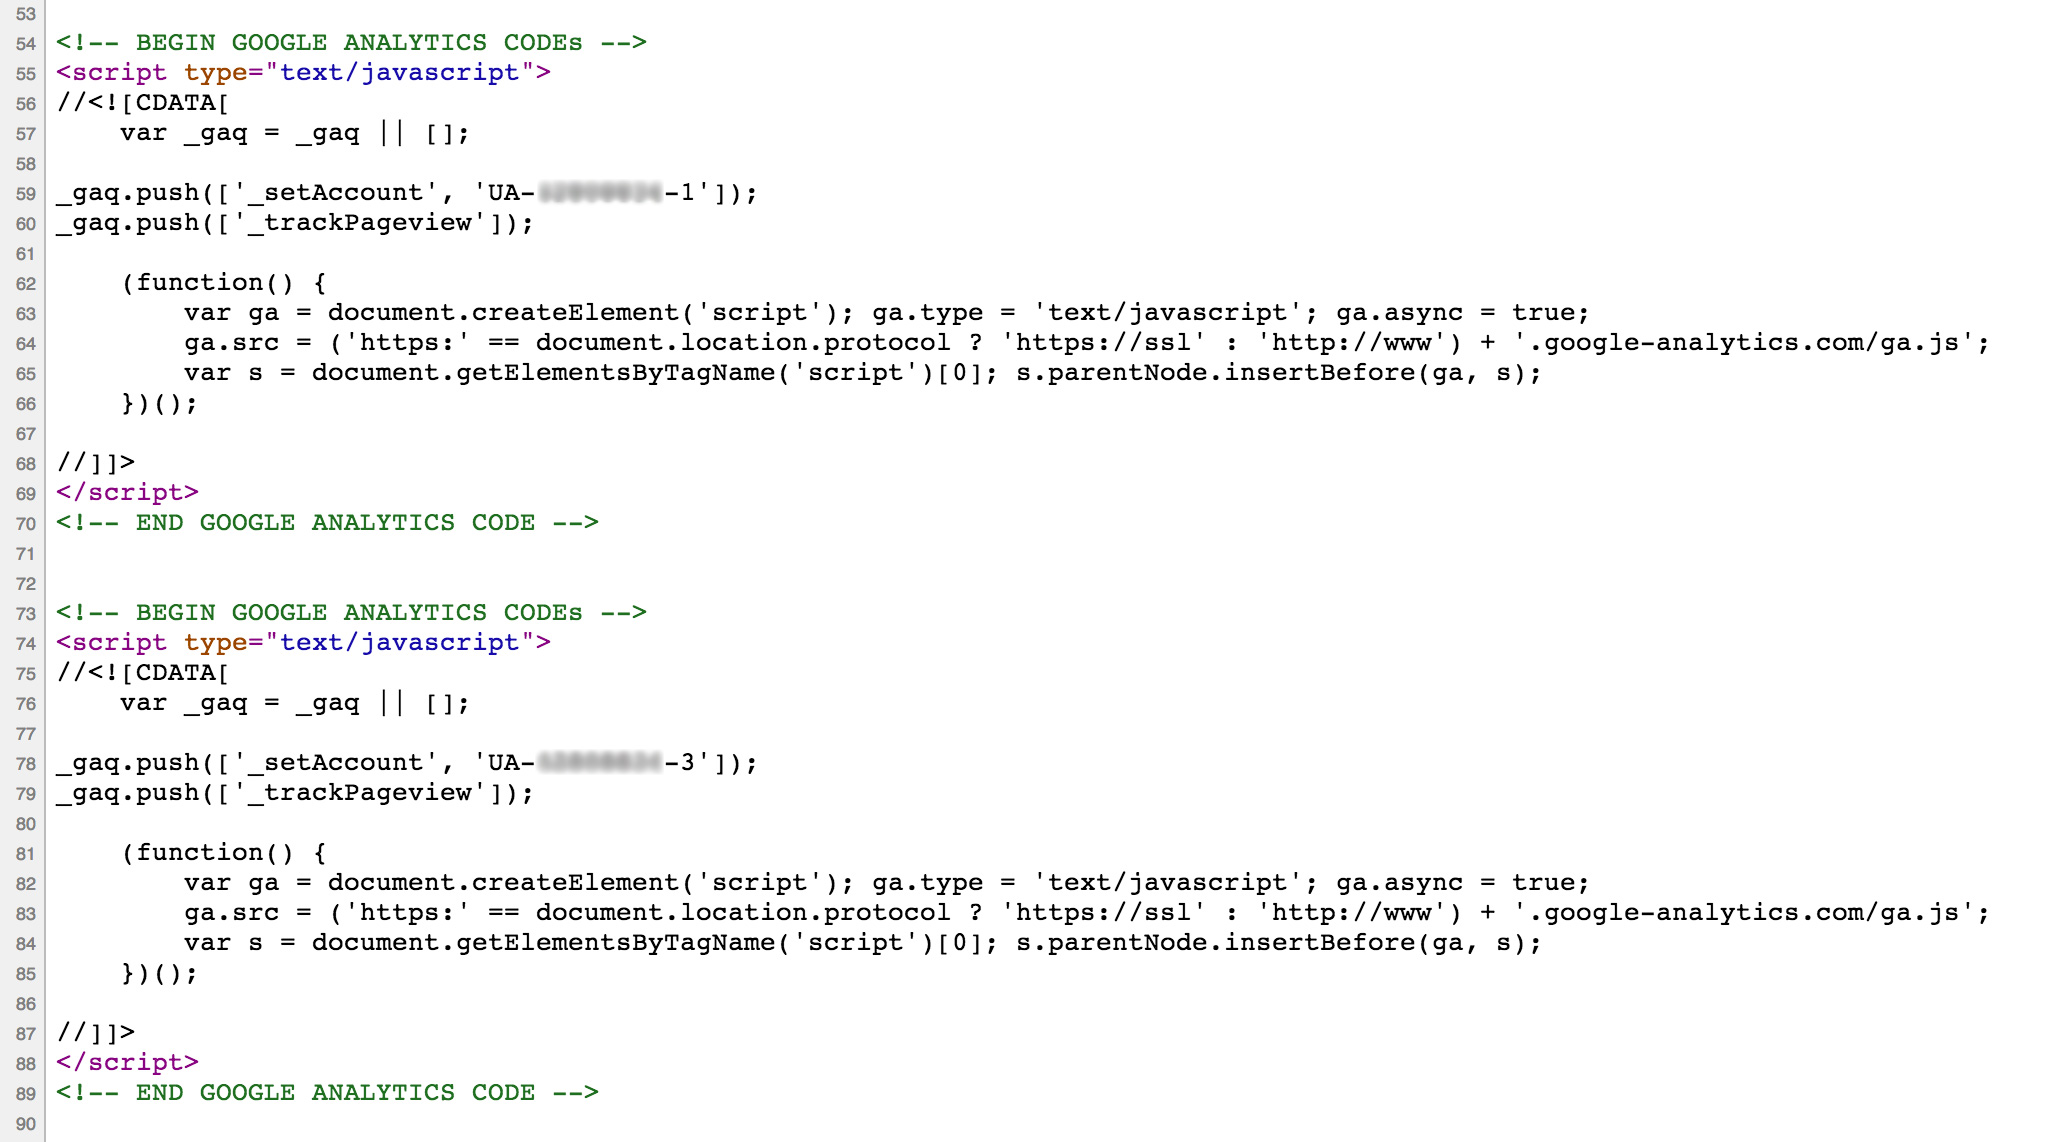
Again, if we were to see the other theme the other alternative tracking code should appear – but the master one should remain constant.
The Code
Where to find the code
If you want to edit this module yourself you can download the code from our Github Page.
The main coding elements
The main coding elements to this module revolve around the Google Analytics template file and also a few observers to set the theme.
Modifying ga.phtml
Within the module we modified the ga.phtml and remapped Magento to use our template (using our layout.xml). Within this file (frontend/base/default/creare/abtesting/ga.phtml) we’re doing a few bits:
- Duplicating the whole script tag
- Wrapping the duplicated script tag in our own functions (to check for enable/disable etc)
- Setting _getOrdersTrackingCode to a variable so we can use it elsewhere (for some reason, by default, this method gets cleared so you cannot use it more than once – resulting in no ecommerce analytics!)
That really is all there is to the new ga.phtml file. As you can see it still uses the classic analytics method – for those developers out there who wish to attempt to use the new GA tracking code – this is the best place to start editing.
Extending Mage_Core_Model_Design_Package
The next step for us was to hi-jack where the themes are being set within Magento. We found that by extending the class Mage_Core_Model_Design_Package we could override the public function getTheme (you can find our override in app > local > Creare > Abtesting > Model > Package.php).
Within this function we’re performing the following.
- Fetch our A/B cookie
- Fetch our temporary session A/B variable
- We then check to see if our module is active, we then set our class property _theme to the theme we wish to serve – based on whether the visitor has been given A or B
- We then update a small config data element with the opposite theme – so next time someone comes onto the site they receive the different theme.
- We’ve also thrown in a few session variables to make sure that we’re not setting cookies all over the place (remember – cookies are set – but are not read until the page is refreshed – so we temporarily use session variables so we’re not doubling-up the code)
- Finally we use a simple observer to clear our session variables.
The rest is simply creating an admin area where you can select your theme / package and input your GA code.
That’s about it, we’ve also added in a couple of methods in the helper whereby the default GA code is brought back on it’s own if we have neglected to miss out a few things in the configuration.
If I’ve missed anything out, or if you have any questions please leave your feedback below, on the Magento extension page or give me a tweet (kent_robert).