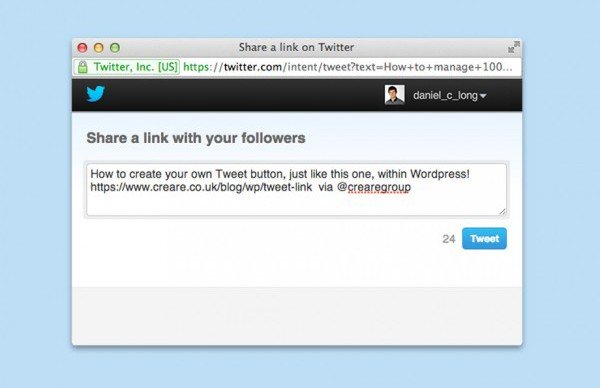
You’ll notice just above this sentence, we have a little twitter icon and count for how many times this article has been tweeted. Todays tutorial will show you how to create your very own tweet link, if not the same (for your single.php).
There’s a few things which this tweet link actually does which I’ve listed below.
- Pull’s in the post title & URL encodes
- Grabs the link of the post & URL encodes
- Gets the authors Twitter handle & company twitter handle
- Inserts any hashtags we assign in the back-end of WordPress
- Gets the number of tweets this post has had (this is a separate tutorial, coming soon!)
So in this tutorial, I’m going to show you how we’ve set up this button and in a separate tutorial, I’ll show you how to grab the tweet count per post and if you’re lucky; show you how to set up a widget to order your posts by the tweet count!
I’m sure most of you have heard or even had a go with the Twitter API, this is exactly what we’re going to be using today. More specifically, we’ll be creating our very own custom Tweet Button. So lets get to it.
First things first
As our implementation of this button is a custom build, we’re just going to pick what we need from the API and add it in manually. The first thing we need is an actual link. This will be where the user is taken when they actually click on the tweet button.
There’s two links we can use which I found, listed below.
- https://twitter.com/share?
- https://twitter.com/intent/tweet?
Both work in exactly the same way, but the Twitter API recommend using the first link and the second is the URL you are taken to. I have noticed that if you use the second link, the tweet window is a little pop-up box, whereas the share link (first link), takes you to a new tab. Twitter also recommend using a javascript include for this, which you can find here.
Now you can create your button and the good thing is, you can make it look however you like, because all we need is an <a> tag for this to work. We’ve used a font awesome icon on ours and the count, but maybe you’ve designed a little button for yourself or using an icon—it’s completely your choice.
You should end up with something like this:
<a href="https://twitter.com/intent/tweet?" title="Tweet Me">Tweet Me</a>
Very basic, but with the power of CSS, you can do pretty much anything to it.
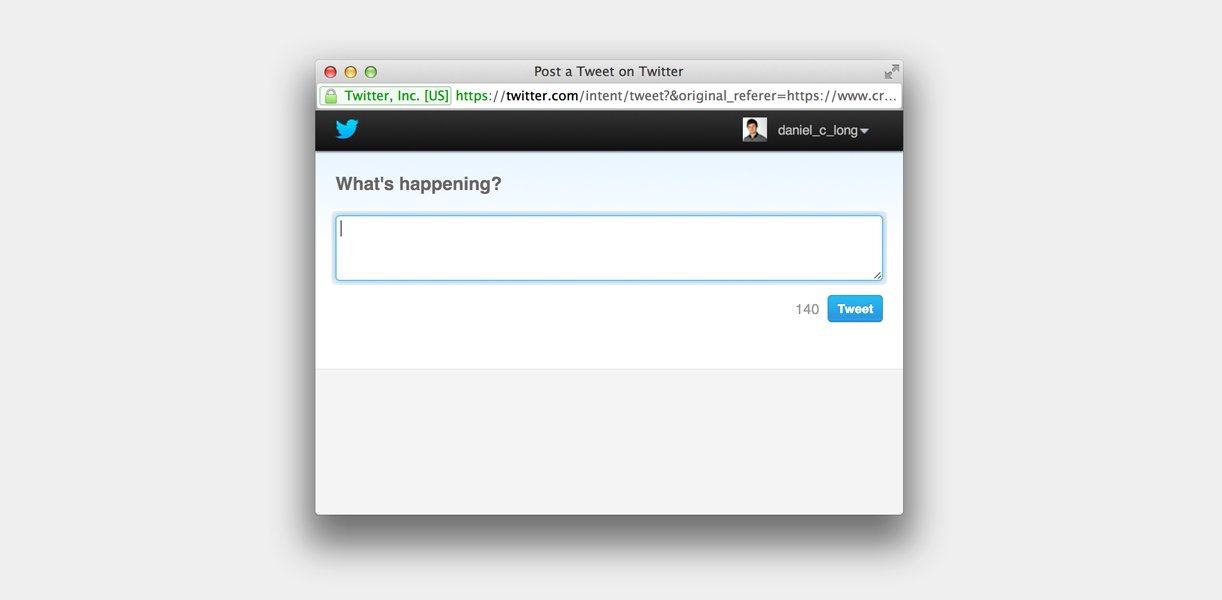
To test this is working, even at this stage, simply click your tweet button and you should be taken to Twitter with an empty tweet box.
Tweeting the post title & URL
OK, now we’ve got the basic implementation working, it’s time to step it up a gear. What we’re going to do now, is bring through the post title & post link.
It’s really easy to do this and the good thing is, all of this data we add to our tweet link is passed through the URL, so we can use URL parameters. There’s a full list of these parameters on the API website. There’s only a few we need to use for this tutorial, but taking the method we are going to follow, you could use whichever you like.
The ones we will be using today are:
- url (URL of the page to share)
- via (Screen name of the user to attribute the Tweet to)
- text (Default Tweet text)
- hashtags (Comma separated hashtags appended to tweet text)
It’s really easy to use these on our tweet button. Let’s look at how we’ll structure these first and then we’ll look at combining them.
So the correct format is this:
- text=Create your own Tweet Link for WordPress
- url=tweet-link
To combine them, we just need to put & in-between each property.
There’s two more things we need to bare in mind, the first is that these are going to be passed through the URL and the second is how to get these dynamically. Both have really easy solutions.
Passing the parameters through the URL means we need spaces and special characters to be passed through safely. There’s a PHP function which can do this for us called urlencode. We simply pass the title and link through that function to get the correct output added in to our tweet button.
Even easier, we need to get the title and link dynamically. As we’ll be putting this button within our WordPress loop, this is going to be a walk in the park. Here’s what we need:
text=urlencode( get_the_title() )
url=urlencode( get_parmalink() )
So let’s put all this together:
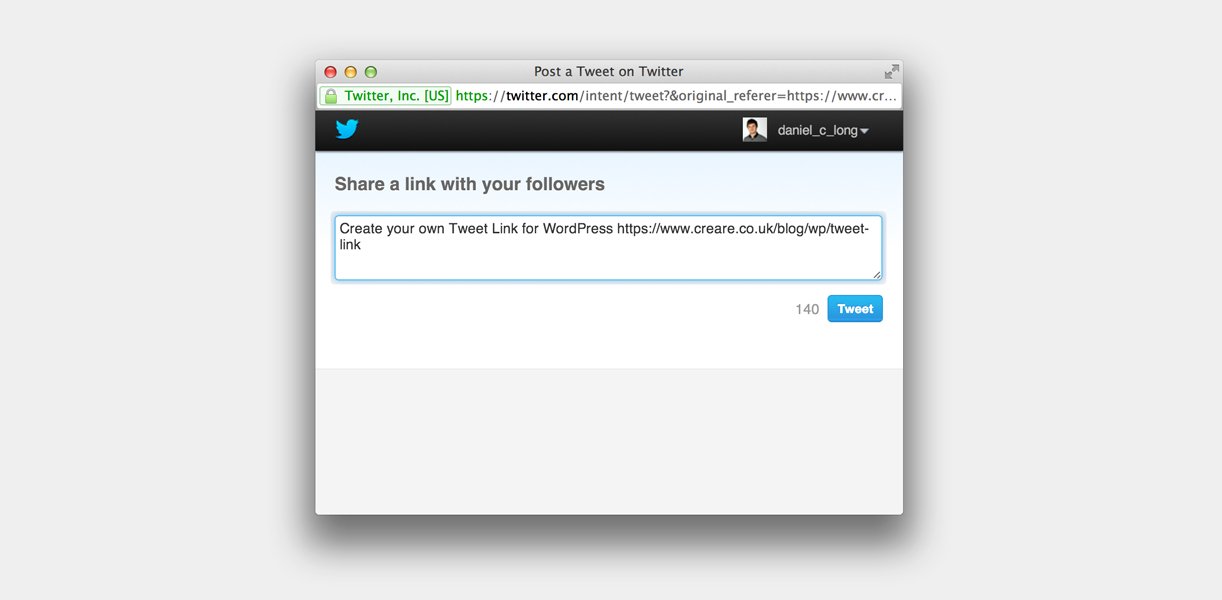
<a title="Share this on Twitter" href="https://twitter.com/intent/tweet?text=<?php echo urlencode( get_the_title() ) ?>&url=<?php echo urlencode( get_permalink() ); ?> title="Tweet Me">Tweet Me</a>
Now if you test the button again, you should be taken to a Twitter page which has your post title & a link to the post in!
A little something extra
I mentioned that we can also grab the Twitter handle of the author and any hashtags. This does depend on the set up of your WordPress installation, but here’s how we achieved this.
Twitter Handle
We’ve added an extra field on our user profiles which is specifically for our authors handles. We simply load this author_meta field and add it into our ‘via’ parameter. Twitter adds the @ symbol automatically. Remember, if you’re adding it on, don’t forget the & between properties.
Hashtags
To achieve this, we’ve used Advanced Custom Fields to create a new field on our post page. This is just a simple text field where the author can decide whether or not to add hashtags. Simply typing them, comma separated, we bring them through to the ‘hashtags’ parameter, again urlencode and Twitter does the rest!
That’s all folks…
So quite a quick technique, but something that can prove to be very powerful. Why not give it a go?!
To see the completed implementation, with Twitter handle and Hashtags, give the little Twitter icon a click at the top of this page and give it a little tweet!