With the popularity and usage of Windows 8 now increasing, it is important that us web designers begin to maximise on the marketing potential that Windows 8 Tiles offers.
The Windows 8 start screen allows users to stay connected with their favourite apps, websites and content through the use of squared app styled icons. Designers now have the opportunity to market and promote their brand on visitors start screens, which in turn will increase returning traffic to pinned websites.
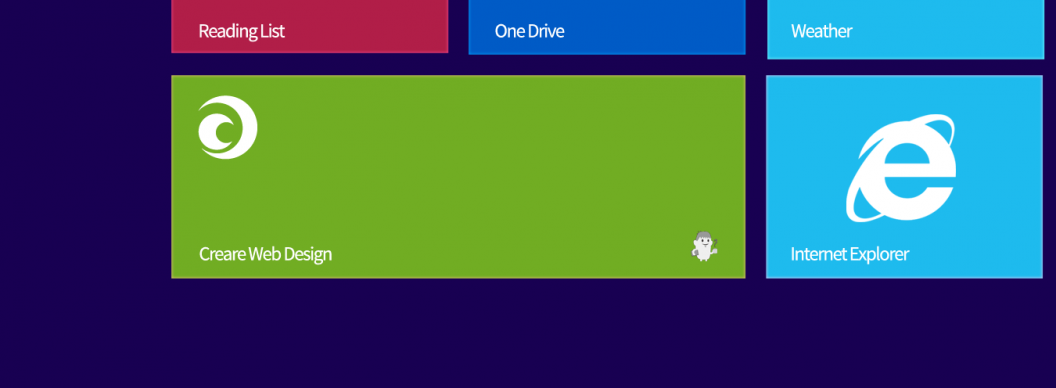
Creating a Windows 8 tile is easy to do and fuss free. With a few lines of code you will be able to create a basic, brand specific tile for your visitors. Users are able to pin tiles to their start screen in four different sizes:
- 70px  x 70px
- 150px x 150px
- 310px x 150px
- 310px x 310px
It is therefore important that we cater for all four choices and create four separate png icons. I’d recommend designing your icons with transparent backgrounds as you are given the ability to alter the background colour within the websites HTML code.
Icons complete… Now What?
Once you have your icons designed, head over to your websites <head> and insert the following code, ensuring that the referenced file names match.
<meta name="application-name" content="Company Name" />
<meta name="msapplication-TileColor" content="#FFFFFF" />
<meta name="msapplication-square70x70logo" content="tiny.png" />
<meta name="msapplication-square150x150logo" content="square.png" />
<meta name="msapplication-wide310x150logo" content="wide.png" />
<meta name="msapplication-square310x310logo" content="large.png" />
There are a few declarations going on above, so I will run through each line individually.
The first line provides you with the opportunity to add a title to your tile. This will appear in the bottom left hand corner and will most commonly be your company name.
<meta name="application-name" content="Company Name" />
The second line allows you to add a background colour that will sit behind your icon, simply add the HEX value to the content attribute.
<meta name="msapplication-TileColor" content="#FFFFFF" />
The last four lines of code specify the different tile sizes and allow you to link to your icon images.
<meta name="msapplication-square70x70logo" content="tiny.png" />
<meta name="msapplication-square150x150logo" content="square.png" />
<meta name="msapplication-wide310x150logo" content="wide.png" />
<meta name="msapplication-square310x310logo" content="large.png" />
Once you have amended the above code to ensure the file names are referenced correctly, upload your header file and your icons onto your server. Windows 8 users will now be able to add your custom tiles to their start screen.
In part two, we will be covering more advanced tile features, such as:
- Using XML to reduce the number of Meta tags involved in adding Windows Tiles.
- An introduction to Windows Live Tiles.